

I’ve had this laptop for a very long time now, it’s been to hell and back. For a long time now it’s been running WinXP which just last year I switched to Ubuntu. I’ve always wanted a Mac for the longest time, but I don’t have the money. So began my quest to converting this laptop into my very first Hackintosh. After hours of searching I’ve finally have it. Sadly I don’t think Snow Leopard can run on it; if you know how please let me know. Now, for the tutorial! 🙂
What you’ll need:
- Blank DVD-R or +R
- Flash Drive
- Brain
1. Now the very first thing you’re going to do is to download and burn iDeneb v1.5. I used UltraISO to burn it but, you can use whatever you like. Be sure to burn at x4 speed just to be on the safe side. 😉
2. Insert your newly burned disc into your laptop and reboot!
3. Press enter at the text mumbo crap.
From here on out I’ll baby you with pictures to actually show what to do.
4. This screen will pop up and it’ll take some time to load.

5. After some time you’ll be prompted with this screen, choose your language.

Preparing crap…

Welcome to iDeneb!

6. Now we’re going to open up Disk Utility like so:

7. Erase your hard drive to Mac OS Extended (Journaled)

8. Quit Disk Utility properly.

9. Agree to this screen and select the hard drive you wish to install to.


10. STOP HERE This is where we’ll be patching up Leopard to work. Select Customize

You will get this screen

11. Select any languages you need and I will list the needed patches:
- Chameleon v2
- DSDT Patcher
- FireWire Remove
- VoodooBattery Manager
- 9.7.0 Qoopz
- Generic AC97 Audio
- ICHx Fixed
- Intel GMA900
- We’ll get to wireless later.
12. You can choose to skip this part, if it comes up with your disc is dirty then restart and choose to skip it.

Go outside or something, this will take some time.
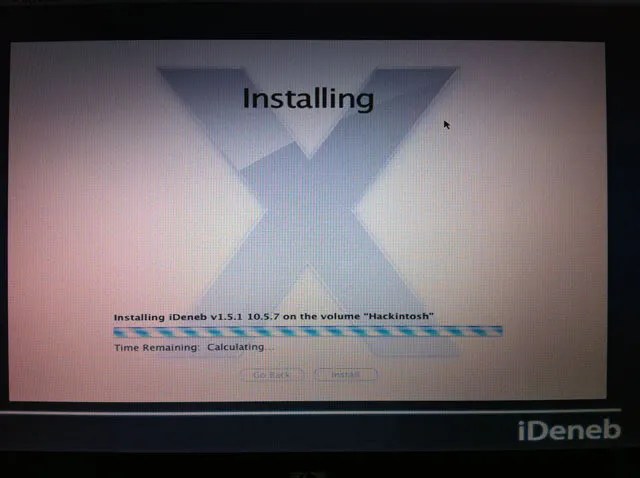
After installation your computer will reboot and this time don’t press anything on start up. You will be greeted with the following intro:
13. Finally! We’re done and ready to set up our hackintosh.

Select region

Choose the very last option here.

How do YOU connect?

Now for this screen is for if you plan on connecting to the internet via LAN. If not or have no idea what that is simply click continue.

Enter your Apple ID if you have one or not. I have one, but choose not to enter it in since I won’t be needing it.

Do not fill this out. Simply click continue twice.


Here is where you will set up your account. Fill it out.

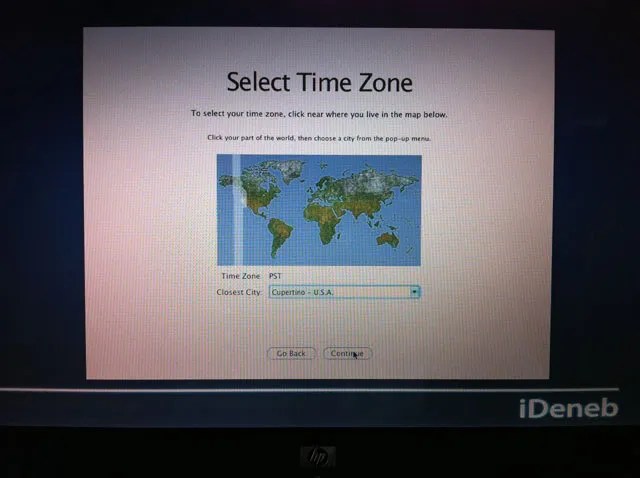
Now for time zone, in the box search for a major city nearby with the same time zone as your own city/town. I live in Wisconsin, but the only major city near me is Chicago which is what I need: CST
Don’t forget to NOT register.

If everything went well you will arrive at your new desktop!

14. Our last step is to install the kext for our wireless card. Specificaly VoodooIntel2200BG. There are 2 variations of it. The one I use here can be found here. It’s a .dmg so mount and install. Then reboot. You’ll have a new icon on the top right, open it and everything is pretty much straight forward from there.

Feb 01, 2011 @ 15:08:57
hey.. thanks for the tutorial.. was wondering what the flash drive is for as you didnt use it during the installation.
Feb 01, 2011 @ 15:29:58
It was for transferring over the kext for the wifi. My laptop doesn’t work with my modem and I don’t have a spare Ethernet cord so I used my main computer to get it.
Feb 10, 2011 @ 17:16:43
thanks for the reply…however, the kext for the wireless didnt work.. got a kernel panic.. any other way of going about it.. and have a found a battery monitor for the laptop (i’ve used ideneb 1.4 10.5.6).. thanks again
Feb 25, 2011 @ 20:02:57
I like your presentation. You have actually followed the exact steps.
But i have a problem with mine.
I have a Toshiba Laptop Satellite L505, an intel cpu, intel graghics, 3GB RAM
and when i try to intall it stops at the ninth (9) point of your presentation. I mean where the is intallation realy starts.
Do you have any solution for Me?
It tells me the my comouter does not support the OS.
Hope to here from you soon.
thanks.
Feb 25, 2011 @ 20:26:19
I like your presentation. You have actually followed the exact steps.
But i have a problem with mine.
I have a Toshiba Laptop Satellite L505, an intel cpu, intel graghics, 3GB RAM
and when i try to intall it stops at the twelveth (12) point of your presentation. I mean where the is intallation realy starts.
Do you have any solution for Me?
It tells me the my comouter does not support the OS.
Hope to here from you soon.
thanks.
Apr 21, 2011 @ 16:52:12
Wow, way cool thanks so much for the tutorial and the picture guide :D.
I am having trouble with wireless. I chose “My computer does not connect to the internet” and I installed the kext you provided. The app keeps crashing when I try to connect to a network.
You should also point out that the wifi kext you’ve provided doesn’t support WPA!
May 01, 2011 @ 07:04:07
Hey, i was just wondering where and how do you apply the patches?
May 04, 2011 @ 13:10:45
This looks pretty cool, however, i’ve been trying to boot mac onto my PC for about 3 years (With several breaks ofcourse..) but I can’t get to the screen where you choose your language etc. I always get a error symbol above my apple, and it wont continue. Other times, I get “Still waiting for root device”. If you could help me I would appreciate it.
Regards,
Raiden.
May 04, 2011 @ 13:11:15
Also, add nexpex@hotmail.com, my MSN.